No Big Deal, Only... The Purpose of Life

Tis the Season to Reflect. 

I celebrated my birthday this past weekend, and we're in the midst of the holiday season. In honor of time passing and days celebrated, here's a post I wrote a few months back on the purpose of life. 

Good tidings to all!

Eureka! 
I've got some good news, folks. I figured it all out! The search for a purpose, motivation for living, reason for the rhyme is so much easier than we thought: We are here to be awed by our own and each others' divinity.

If it's that simple, why is happiness so elusive?
Because we humans love to complain. We don't have enough. We're not rich enough, smart enough, good looking enough, respected enough, or loved enough. We wish [insert friend or relative here] acted differently. We wish certain things did or didn't happen. Wah. Wah. Wah. Poor, sad us. What's the point to all of our suffering and why is it so damn hard to be happy?
 
It's hard to be happy because we think everything needs to make sense!
Our purpose is not to understand, but to experience. We're here to love and be loved, to learn and to teach, to laugh and to cry, to amaze and be amazed. We're here to feel joy and anger, ecstasy and sadness, attraction and rejection. We are here to create, appreciate, and forgive.  

Good Life/Bad Life. It's your call.
We've been granted a brief span of time here on Earth, and what we do with it is our choice. We can be cruel or kind, compassionate or uncaring, generous or stingy, selfish or selfless. We can manifest our gifts, challenge ourselves, and listen closely, or we can ignore our talents, be lazy, and remain deaf to the needs of others. Your choices determine the quality of your life. Don't eff it up. 

What rocks your world?
My soul speaks through art. Writing music and books is how my soul communicates. Music, dancing, books, paintings, sculptures, and great acting move me in ways I can't explain. Other things that rock my world: Spending time with family and friends, delicious meals, CHOCOLATE, red wine, meditation, travel, and healthy living. FIGURE OUT WHAT LIGHTS YOU UP & DO THOSE THINGS OFTEN!

My Greatest Gifts.
My kids, my boyfriend, embraces from those I love, the sound of the waves, the purr of my cats, my health, the health of those I love, enlightening conversations, inspiring music, the words, "I love you," a good laugh...  

These are not just things I enjoy about my life. These things ARE my life. These are some of my greatest gifts, and for that and so much more, I am profoundly grateful.

What NOT to do.
Don't let a moment slip by unnoticed. Don't pass up a chance to kiss your children. Don't miss an opportunity to express your love. Don't let a kind word be left upon your lips. 

Live your life like your life depends on it.
In honor of this precious life I've been given, I hereby promise the following: To practice being gracious and grateful; joyous and generous; playful and powerful; creative and kind.  

I will allow myself and others to make mistakes! I will take honoring and thanking and appreciating and loving to a whole new level.

That's what I realized today. What about you?
You have read this article gratefulness / kindess / what is life about? with the title December 2011. You can bookmark this page URL https://loriescorner.blogspot.com/2011/12/no-big-deal-only-purpose-of-life.html. Thanks!

Merry Christmas {and a Happy New Year!}

Well friends it's that time. Mr. Sweet Love is DONE with his finals. This semester has been the hardest semester he's had at school, which consequently means it's been the hardest semester for our family (and yep we live our lives semester by semester. every 4 months we change our routine, our schedule and sometimes where we live! Who else knows how that is?!?!) which is why you can imagine that I am SOOOOO excited this next semester will be our LAST semester of school eveeeeer!!!

There are actually A LOT of benefits of having a husband still in school when I take the time to really think about it and count our blessings (versus being grumpy that he is studying ALL the time :) ) but my absolute favorite thing about being married to a student, is that we actually GET a Christmas break. THREE whole weeks of a husband, daddy, laundry connoisseur, chef, movie buddy and snuggle time. (okay I made that last one up just to make the hubby squirm) But really I can't even relay to you in words that are in the English language how happy I am that we have three weeks of peace and a stress free life! Being that this is our last semester of school I don't forsee having 3 straight weeks of 'hey what you wanna do?...I don't know, what do you wannna do?...I don't know, what do you wanna do?" ever again, so I'm going to take advantage of this time with my family and sign off the blog until January when Mr. Sweet Love's locked back up in the library.

I have about 4 other Christmas projects I did that I wanted to share with you, but just didn't have the time to post about so I guess those'll have to wait till next year-sorry! Instead we'll be...having family here, celebrating my little girl's 3rd birthday, wrapping presents-after I finish buying them!!!, finishing our '12 days of Christmas' for our neighbor, going to Salt Lake City to see the lights on temple square, baking our eyeballs out, going to a couple movies (my favorite way to waste money! :) ), and lots and lots of sleeping {and snuggling}!

Merry Christmas!

From my family to yours.

You have read this article with the title December 2011. You can bookmark this page URL https://loriescorner.blogspot.com/2011/12/merry-christmas-and-happy-new-year.html. Thanks!

Framed Ornament Wreath

"It came without ribbons. It came without tags. It came without packages, boxes or bags!"

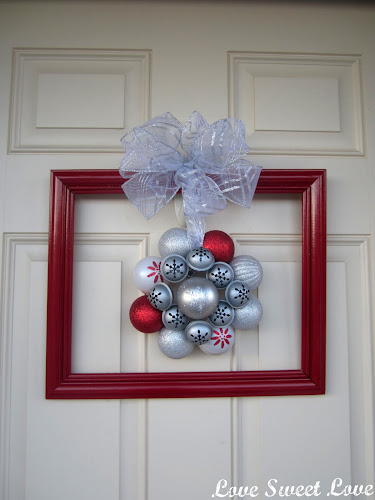
We LOVE LOVE LOVE How the Grinch Stole Christmas movie at our house and even though Mr. Grinch is TOTALLY right when he says Christmas "doesn't come from a store"...I doooo have to admit that a big, sparkly bow catches my eye and pretty little boxes all done up in festive love makes my heart beat a wee bit faster. :) So I'm sorta lovin' this *wreath* I made from an old frame, some dollar store ornaments, $ store jingle bells, and $store ribbon-coming in at a grand total of $4-because it's sparkly and festive!


I actually made this last year before I blogged so I don't have any step-by-step tutorial pictures, but it's 100% simple. I spray painted an old frame red and hot glued ornaments (pack of 5 for $1) and jingle bells (pack of 9 for $1) all together in a sort of 3 tiered circle. I wanted it to have some dimension to it so I did 3 "layers", just hot gluing the ornaments side by side and the bells on top of the ornaments.


Then I looped the ribbon between the top 2 ornaments to hang it from the frame and tied the rest of the ribbon up into a bow.


Love!


But before you get too attached to that look (because I'm sure-after 4 pictures-you have already bonded with my wreath) I must tell you that it's actually inside now hanging on my window frame because I put my white coffee filter wreath outside when I finished it.


I kinda loved that it looked like a pretty little present just hanging there on the door though. :)


Thanks for stopping in today, I'm SO happy you're here!! Now I'm off to finish addressing and sending out my Christmas cards! Have I mentioned that I loooooove Christmas! I hope you're enjoying these last couple weeks of December and not letting the stress of the commercial side of Christmas get to you so you can really enjoy and appreciate this season of giving and trying to be more like our Savior whose birth we are celebrating. I have to keep reminding myself...if it's not a "have to" thing, DON'T worry about it!

How do you stay focused on the true meaning of Christmas amidst all the bustle around you??

Linking up to these great parties as well as:
You have read this article with the title December 2011. You can bookmark this page URL https://loriescorner.blogspot.com/2011/12/framed-ornament-wreath.html. Thanks!

This is For the Children

Sometimes I spend hours arduously contemplating every word I put in a post. Other times, random unknowns like this guy (Jimmy Kimmel? What the hell kind of name is that?) make my job so freaking easy.

Click on this link for some great holiday laughs. 

http://youtu.be/q4a9CKgLprQ
You have read this article Christmas presents / Jimmy Kimmel / kids opening terrible presents with the title December 2011. You can bookmark this page URL https://loriescorner.blogspot.com/2011/12/this-is-for-children.html. Thanks!

Welcome Jaime from Polka Dots on Parade!!

Today I'm so excited to welcome Jaime from Polkadots on Parade!! I just LOVE the name of her blog and her blog is just as fun as it sounds!! I link up to her Wow Me Wednesday linky party every week and always find such great inspiration there!

So happy to have you here at Love Sweet Love Jaime, show us whatchya got!


Hi Friends!!

I'm Jaime from Polkadots on Parade!


Isn't this fun??

I'm loving this time of the year for all the craftiness it brings out in people!

I think we are all a little more inspired this month!


Christmas to me means baking up some sweetness!

Get your HO HO on with these holiday hotpads!


Begin with 4 squares of Insul-Brite and 4 squares of fabric, 8" square.


Set your stitch length long.


Baste each piece of fabric to a piece of Insul-Brite.


Then pair up the sewn squares, fabric sides together and stitch them 3/4 of the way around the hotpad.


Turn hotpad right side out and stitch all the way around the edge, closing the hole.


And your hotpads are complete!

Unless you want them fancy, and we do!

Cut your letters out of coordinating fabric.


Pin them on the hotpads and applique with a zig-zag stitch.


HO HO!!


Happy HO HO holiday hotpads!!

Thanks Angela for having me here today!

Happy happy holidays everyone!!

------------------------------------------------------------------------------------------
Those are SOOOO adorable! You guys know I do not cook, I do not bake, and I really spend no time in the kitchen other than to eat food my husband makes, BUUUT my cute kiddos and I are having our Christmas baking day this weekend and I'm thinking I just might need to whip these up for the festivities...maybe they will help me enjoy the baking rather than sweat the small stuff...ie my kids licking their fingers and sticking them back into the bowl, throwing flour by the handfulls onto the floor, adding an extra cup of salt b/c he thought it was sugar into the cookie mix....you know, stuff like that. Good thing none of these treats are coming to your house. Sorry neighbors, just bless the treats before you eat them and it'll be all good!

Thanks for the great tutorial Jaime!! Thanks for popping in today friends, EEEEEKK Christmas is coming so soon-I. Can't. WAIT! Love yall!


You have read this article with the title December 2011. You can bookmark this page URL https://loriescorner.blogspot.com/2011/12/welcome-jaime-from-polka-dots-on-parade.html. Thanks!

Shabby Apple Necklace WINNER and a HANDmade Holiday gift!

I wish ALL of you (and me...I'm just gonna throw that out there) could take home this beautiful vintage key Shabby Apple necklace, but today it will just be ONE of you. Are you the lucky one?? Watch and see...

*winner was selected via the generator from random.org but it's just tradition on my blog to have my littles announce the winner on video :)


And just in case you're at work right now and can't watch the video because you'll get busted by the boss man for looking at craft blogs instead of working :), the winner is...

#23 Jennifer said...

I like Shabby Apple on Facebook!


Congrats Jennifer, who blogs at Vintage Gwen, I am THRILLED for you!! Email me at loveseweetlove@gmail.com so we can get your necklace to you!

But you don't have to cry if you didn't win, remember you can still use the code "sweetlove10off" at checkout at Shabby Apple to get 10% off your purchase until Jan. 5th. Merry Christmas!

AND P.S., I absolutely loved reading all your #1 Christmas wishes they were so fun so thanks to those of you who shared those!!!

Alllllso-P.S.S.-, I'm guest posting over at A Little Tipsy today for the sweet Michelle where I'm sharing a Holiday gift idea, I would love for you to stop by and say hi to me over there!! (EXCEPT YOU MOM. Seriously don't. Love you.)
You have read this article with the title December 2011. You can bookmark this page URL https://loriescorner.blogspot.com/2011/12/shabby-apple-necklace-winner-and.html. Thanks!

Welcome Jennifer from Delightfully Noted!!

Okay, so I know you have been up to your eyeballs in Christmas this past week, but you are going to LOOOVE the simplicity of today's post by Jennifer from Delightfully Noted! This little treat she has in store for us is the perfect little FREEBIE :) we need at this crazy time of year! Aaaaand if that's not enough, I'm now introducing you to your new best friend forever. Well...she can't be your new BFF cause she's mine, and I'm kinda obsessive about my friends when they're this cool, but she can be your BF mmmmkay? Seriously though you HAVE to go check out her blog-EVERY post. Every. Post. makes me laugh.

Thanks for being here girly, take it away.....

Greetings! I’m Jennifer, the CEO {crafty, enthusiastic oddball} of Delightfully Noted, my little corner of the world where I get to share my passion for all things creative & everything delightfully in-between. I'm also the owner/wanna-a-be graphic designer behind a little stationery shop on Etsy called, well, of course.......Delightfully Noted.

Blog

I’m super excited to be in Angela’s hood today. She’s so sweet. She didn’t even bat an eye when I suggested I share with you all the story of the time I accused my husband of hiring a hit man. Perhaps she feared for her life if she said no. Buuuttt I decided to save that tale for some other time mostly because every time the hubby and I tell that story we lose a friend or two an angel gets its wings…..or something like that. I always get that confused with bells. I figured at this time of the year there’s an abundance of angels getting their wings {thanks to the Salvation Army bell ringers whom I’m pretty sure are running a monopoly on angel wings} and I didn’t want to be responsible for contributing to limited air space or anything. Sooooo, on a more cheerful note I decided instead to share a free holiday printable with you all!


You can download your free cupcake flags here.


Print on paper or card stock.


Then all that is left to do is cut & decorate!


Cupcake flags are an easy way to add a little festive touch to any of your baked goods or use them on toothpicks for appetizers. I added little pom pom embellishments to the top of my lollipop sticks to dress them up a bit.


I hope you enjoy your little free treat!

Happy Holidays to you and yours!

Thanks Angela for sharing your space with me.

-----------------------------------------------------------------------------------------------------

Wouldn't these would be SO SO SO perfect to use for some quick neighbor gifts this Christmas, or to take for your kids school Christmas party, or maybe a Christmas party you're hosting??, or just to perk up some cupcakes for the fam?! I love the simple little touches that give things that extra spark-I mean, how could you not be cheery and bright with that little pom pom flag waving in your face ontop a scrumptious cupcake?! Perfection Jennifer, simply perfection! Thanks for sharing your talent for design with us! Don't forget to check out her wonderful etsy shop here and you can find her on facebook here!

Thanks for stopping by today girlies, I hope all your Christmas plans are coming along wonderfully!! Don't forget today is the last day to enter the Shabby Apple giveaway, see you back here tomorrow where I'll be announcing the winner!!!
You have read this article with the title December 2011. You can bookmark this page URL https://loriescorner.blogspot.com/2011/12/welcome-jennifer-from-delightfully-noted.html. Thanks!

Creating Christmas Linky Party

Hey my peeps! It's here, It's here, It's here...the HUMUNGO JUNGO Christmas Linky party! Oooohhhhh I SO hope you've been inspired this week and are letting the beauty of Christmas wrap it's pretty little festive arms around you! Please Please link up anything and everything Christmassy you've been working on this month, I can't wait to see what you've created!!! (not to mention that your project will show up on 18 blogs! Eeeek!)

CREATING_CHRISTMAS_BANNER_jpg


And now a note from our wonderful host, Diana from The Girl Creative...

As we wrap up Creating Christmas week I hope that you have all been inspired to stop pinning and start creating! I’m excited to see what everyone has been working on. This Christmas Linky Party is no ordinary party. This is a blog hop. And what that means is that there are 18 FABULOUS bloggers that are hosting this party at their very own blog. Whether you add your project link here or at any of the other 17 co-hosts blogs, it will show up on one huge party list! Awesome!
If you haven’t already, please take the time out to visit the other co-hosts and go through their Creating Christmas posts. There is some really neat projects!
The Girl Creative, Que Linda Crafts, The Cottage Market, Love Lindsey, Domestic Mischief, Chicken Scratch, Love Sweet Love, Randee’s Organized Chaos, Musings of a Glamour Puss, Anastacia Knits, Southern Scraps, Modern Yet Old Fashioned, Broken Treasures, Alyssabeth’s, Domestic Deadline, Life on Walnut Street, 52 Mantels,
The Glamorous Life

The Rules are SiMpLe:


  • Add a link to a project that YOU have created!

  • Visit the 2 links ahead of you and check out what they’ve got going on. Leave some comment love. Tis the season for giving after all. {wink wink}

  • HAVE FUN AND BE INSPIRED!!


Linky Tools subscription expired. List not available.
You have read this article with the title December 2011. You can bookmark this page URL https://loriescorner.blogspot.com/2011/12/creating-christmas-linky-party.html. Thanks!

Creating Christmas day 7-Welcome to Michaela from Covered in Mod Podge!

Whew, we made it...SEVEN days of Christmas goodness!! I hope this week gave you a plethora of good ideas for decorating, gift ideas and creating Christmas memories! (remember to check The Girl Creative's blog for the other fun bloggers co-hosting this event to see what they've been posting all week too!)

 Creating Christmas at The Girl Creative

Speaking of memories, I am SoOoOoO excited to share with you our very last Creating Christmas project for day 7 from Michaela at Covered in Mod Podge, who has a fantastic gift idea to hold those precious memories!! Take it away Michaela....


Hi! My name is Michaela, and I blog over at Covered in Mod Podge.

Thanks so much, Angela for letting me be apart of your Creating Christmas Series. It's such an honor!

I recently moved half way across the country. The cost of plane tickets alone are at least tripple our normal Christmas travel and gift budget. So, in order to still give meaningful gifts and stay in our very tinny budget, I'm handmaking nearly all of our gifts.


This little diddy is a Brag Book for my dad {who is a first time grandpa to my little miss}. My dad is always wanting pictures of the little miss to show off around the office. I nearly titled this sucker "My granddaughter is cuter than yours." I have a feeling that's what my dad is saying under his breath as he brags about his new little joy.


In order to create your own brag book, you'll need:

2 12x12 pieces of card stock

1/4 inch ribbon

Photo stickers

Photo corners

Embellishments

Scissors

A scoring tool


I don't have a scoring tool. I don't often work with paper {mainly because I can't cut a straight line to save my life}. So, I looked around and came up with this little pizza stone cleaner that came with our Pampered Chef pizza stone. If you don't have something, I say shop your house before you shop the store!


You're going to want to pick a paper that has two pretty sides. I started out by cutting off the paper selvedge. I wanted my album to be 4x6. I cut each of my 12x12 sheets in half.


Then, I used my super fancy scoring tool to fold each section into thirds.


In order to make a larger album, you have to adhere each of your four pieces of card stock together. I did this using photo squares. I added an extra square to the seam side because of the added stress. Then, you stick the two pieces together, making sure the folds continue to make the accordion.


Next, cut a 25 inch piece of ribbon. I cut mine on a diagonal so it looks all fancy. Use Fray Check. You'll want to glue the ribbon along the middle of the front of the book. Only glue it to the front or you won't be able to open your album all the way.


Then, put your embellishment cover piece down. I printed this awesome free chevron print {thanks Nat!} onto card stock and then cut it down to 4x4. Decorate to your heart's desire! {I'm a sucker for lime green and glitter, so these stickers were heaven!


I used clear photo corners to attach my photos. I also left the back side nearly empty. I'm going to send pictures and photo corners from time to time to my dad as the little miss grows. That way, this album will document more than the first six months of her life.


Tie the bow and you're set.


What grandparent wouldn't love a brag book!

Thanks again, Angela for having me. I hope you all will come visit me over at Covered in Mod Podge!


---------------------------------------------------------------------------------------------

Thank YOU Michaela for finishing up our week of Creating Christmas with such a GREAT gift idea! I absolutely LOVE the idea of a brag book and Michaela made it the prefect size for an adoring grandparent to carry around and show off! I think my favorite part about it, is that nothing's permanent so you can change the pictures as they grow and don't have to make a whole new one-great idea!

And a BIG thank you to YOU for coming back everyday to share in all the fun!

**Don't forget to enter the Shabby Apple necklace giveaway going on now!**
You have read this article with the title December 2011. You can bookmark this page URL https://loriescorner.blogspot.com/2011/12/creating-christmas-day-7-welcome-to.html. Thanks!

Creating Christmas day 6- A Christmas Card Holder {by me!}

Has this week been fantastic or what?! I feel SO blessed to have had so many great bloggers help me out with Christmas projects this week and thank them SO much for their time guest posting on Love Sweet Love! I hope you have loved their projects as much as I have and were inspired to come up with some of your own holiday cheer. :)

For day SIX of Creating Christmas I wanted to jump back into the blog myself-if you don't mind :)-and share a project I shared over on Crafty Scrappy Happy at the beginning of the month.
 Creating Christmas at The Girl Creative

One of my absolute favorite things about the Christmas season is receiving cards from family and friends all over the United States and being able to 'connect' with them at this special time of year. In the past the "special place" I've stored all these meaningful cards has been on top of my kitchen counter-in a sloppy pile. I thought this year they deserved a real home, so I transformed an old shutter into a Christmas card holder!


I got this idea from a friend at church who was making them for an activity. She found a local store in our area that was selling old shutters for just $2 a piece-score! I definitely was not going to miss out on that deal so I grabbed a couple from her and busted out my Rustoleum spray paint!

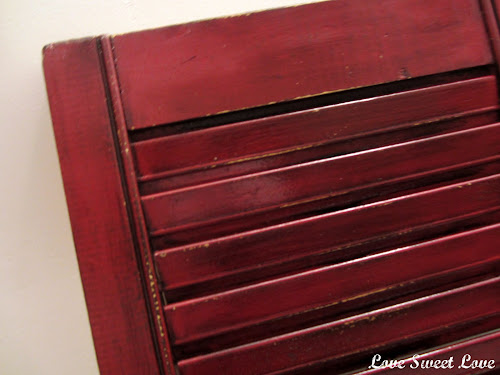
I knew I wanted the color to come out a deep red to match some of my other Christmas decor, so I first spray painted one coat of Kona Brown and once that was dry added a couple coats of red.


It came out looking like this:


Which I actually really loved, but since it's absolutely impossible for me to leave anything alone, I wondered what some sanding and dark walnut stain could do...


Oh SQUEAL! Love!


I have so many projects that happily pay my garbage man visits, that on the rare occasion that something actually comes out the way I envision it in my head, I get pretty darn tootin' excited about it.


Originally I was just going to add a simple felt christmas tree, or stocking to the bottom corner for some embellishment- not that any is really needed since the cards that will go in the shutter are what "embellish" it-but when I turned out with this vintage bad boy I knew some of these old-school cut outs (from Michaels) were going to be sneaking there way onto the shutter.


Something about these old "pictures" just makes my heart melt...


...and I got a little carried away...


...but seriously, can you blame me?!?!


Since Christmas cards haven't started going out yet, I picked a few homemade/vintagey type ones that I've kept over the years and put them in so you could have a little looksy.


And that's it!


And since I hadn't decorated for Christmas yet when I made this, you get a picture of it in my makeshift studio-aka my living room...with a florescent lamp...at night, yikes. So just imagine it's sitting next to pretty Christmas decorations, in nice lighting, mmmmkay?!


Oh! And in case you were wondering, the cards stay tucked nicely into the slats because of the stick of wood that runs up the back (you know...the thing that you use to open and close the shutters, and if that rod has a name I obviously don't know what it is) but if you find a shutter that is missing that piece you could just use some wood glue and glue a thin piece of wood to the back and I think that would do the trick as well!


Yay! A pretty, organized, way to display all those special cards we receive from family and friends throughout the season!


Thank you so much for spending the week with me and helping me celebrate Christmas!! Buuuut the fun's not over yet...I have one more EXCITING project in store for you from one last guest poster tomorrow so come back ok?! And then...the moment you've been waiting for...(okay I know it's the moment IIII have been waiting for!!) will begin. The HUMUNGO. JUNGO. Christmas linky party!!! See ya tomorrow friends!

**Don't forget to enter the Shabby Apple necklace giveaway going on now!**

Linking up to these great parties as well as:

You have read this article with the title December 2011. You can bookmark this page URL https://loriescorner.blogspot.com/2011/12/creating-christmas-day-6-christmas-card.html. Thanks!