Haaaaapy Friday my friends!! Can you believe we're already heading into the end of January?! With the kind of weather we're having in my neck of the woods it feels more like spring than winter (which is TOTALLY A-OK with me!) since we've had hardly any snow this year (in comparison to years past-compared to...Texas we'd be a winter wonderland :) ).
Okay so I'm pretty darn tootin' excited to show you a project I created last year for Valentines day. It was before I was blogging, but I was thinking about starting a blog last Feb. so thankfully I do have some step-by-step pictures for you if you're interested!
It's not very often that I do a project without completely copying a tutorial I find on a blog or Pinterest, and it's even less rare for me to come up with an idea all on my own, so I'm pretty proud of the fact that I thought of this just by sitting in my garage starring at a tub of old "house decorating stuff".
DIY Valentine Framed Artwork
The supplies I used were old picture frames, scrapbook paper, vinyl, square glass coasters, and E6000 glue.
First I picked 3 different size picture frames, took the glass out and spray painted each of the frames black.
Then I came up with 3 different Valentine phrases I wanted to use for each picture
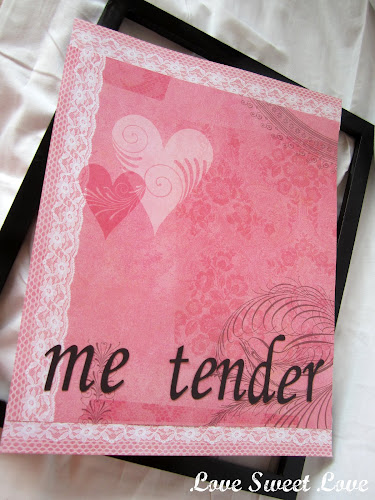
-LOVE me tender
-Be My Valentine
-Save the Date: 02-14
I had 10 square glass 'picture' coasters (the kind you can slide a small 2x2 size picture into) just collecting dust, so I came up with a different layout for each frame with my coasters and phrases and got to work.
For the 'LOVE me tender' frame, I cut the words 'me tender' out of black construction paper using my cricut and used double sided tape to tape each letter to the scrapbook paper (from Hobby Lobby).

I cut 2x2 squares from pink cardstock and cut the letters L-O-V-E out of black vinyl (using the cricut) and placed one letter in the center of each cardstock square.

After I slide them into the picture pocket on the coaster I used E6000 to glue them where I wanted them onto the glass for the frame and let it dry/harden overnight.

Then I just slid the scrapbook paper behind the glass put the frame back on and I had my own customized Valentine artwork!


I followed the exact same steps for the other 2 pictures, just changing up the phrases and placement of the coasters on the glass.

The 'Save The Date' and 'Saint Valentines Day' are cut from construction paper and the hearts, and numbers are cut from vinyl.

I pretty much do not do a craft without adding some sort of bling-a-ling to it! :) For this frame I added a couple white rhinestones to the letters V, N & E (on the outside of the glass) to give it a little something different.


And remember, even if you don't have a cutting machine you can always just use scrapbook stickers to get the same look!
You could get really personal and creative with these if you used phrases you share just with your husband or kids that are special to you. What a meaningful craft this could be! Wish I would have thought of that last year, but I still like the way these turned out!
Next up...a little XOX. ;) See ya soon!
Linking up to these great parties as well as:
You have read this article with the title DIY Valentine Framed Artwork. You can bookmark this page URL https://loriescorner.blogspot.com/2012/01/diy-valentine-framed-artwork.html. Thanks!


