
I'm SO sorry this is getting posted a day late! I've got an extra {cute} 3 year old running around my house this week, and now I'm seeing what it'd be like to have a 4 year old and twin 3 year olds all under the same roof...wow! Let's just say I'm not getting quite as much done as I usually do ;).
Buuuut I am so so so so so excited to show you what I've been working on the last week and over the weekend because our Ballerina Party was a complete success!!
Buuuut I am so so so so so excited to show you what I've been working on the last week and over the weekend because our Ballerina Party was a complete success!!

Like I mentioned before, little miss K turned 3 and for her first 'friends party' requested it be a Ballerina party. Oooohhhh I couldn't have loved putting this together more!

Since I won the 'procrastinator of the year' award in 2011 (awarded to me by myself of course...anybody else have one of these trophies layin' around?) I thought...why change my ways? In some weird, completely irrational way, I work better under pressure so I put myself in a tiny box of 6 days to plan, create and execute this party. Whew! And I have to say, I only had one meltdown (day of party...I'll explain) so I'm gonna go ahead and chalk that one up for the win category. Booyah!
First I started off with the invites. Of course when it was 5 days, 23 hours, lots of minuets and counting, I had to turn to my dear creative friend Pinterest for ideas and boy did she come through!

I took the idea for the invite from THIS blog and came up with my own little rendition of a Ballerina invite. On the blog I found she has a step by step video you can watch if you're really interested in making one, but here are a few of the pictures I took making a simple ballerina dress using:
-cardstock bodice form (free template found here)
-square of tissue paper
-thin, white ribbon
-double sided tape

After you have folded your square of tissue paper accordion style, you use your double sided tape and adhere it to the front of your bodice attaching the tape right at the waist. You'll want to make sure the folds are spaced evenly to get a pretty skirt form.

The tape should be about 2" so that you have enough to have some on the back.

Turn the dress back to the front and fold down the top half of the tissue paper. Then kinda smoosh (my spell check is telling me that's not a word, but since it's quite possibly the best word in the English language I'm gonna have to rebel) the tissue paper lightly with your finger-you don't want to flatten it completely, just smooshed down enough that the top layer will lay nicely (yet poofy) over the top of it.

Next, f0ld down the top layer of tissue paper and gently give it a little crease to secure the fold.

Now, using the tape on the back of the bodice lay the middle of your ribbon across it.

Turn it over and tie the ribbon into a bow and you're done!

I then used a piece of double-sided tape to attach the dress to the invite.

The invite itself, is a 6x4 pice of light pink cardstock. I used brown ink to darken up the sides and a strip of white ribbon, layered with sheer pink and white polka dot ribbon, across the top. I had some brown scrapbook stickers on hand so just layed a letter K on top of the ribbon for little miss K. I finished it off with 2 hole punches on the top and a matching pink/white polka dot ribbon run through.
The back of the invitation had all the party information:

Then it was time to decorate! On the front door I hung little miss's ballet shoes, using white grosgrain ribbon, behind the coffee filter wreath I had out for Christmas.

I loved the simple little touch adding something personal to her added to the party!

Inside I opted to decorate with...flowers, balloons and food!! I wanted the atmosphere to be frilly, soft, pretty and GIRLY! I went with pink and white for the colors of the party with pops of yellow! I'm a "pop" kinda girl. Two colors just bores me, I have to have something that says, "HELLO!" ha ha!

Using the tutorial found here, from All Things Thrifty, I made these tissue paper pom pom balls to hang from the ceiling, and I have to say I was really disappointed with how they turned out.

The tute wasn't super specific-as far as telling you what kind of wire to buy-so I bought something that was too thick (thanks to the advice from the cashier at Michaels-boo) and the tissue paper didn't bend and fold right because of it SOOOO I didn't get the look I was going for, but it was alright.
My tip to you...the thinner gauge craft wire the better! I would suggest maybe a 24 or 26 gauge.
But back to the food table...the main event of course! :)

Starting on the right end...pink donuts!

Okay they weren't totally pink because apparently to get custom iced donuts you have to place an order (procrastination rocks) so I bought every single donut they had with pink anywhere on it!
Above that we had cotton candy (I hate cotton candy, but love the fluffy texture for the purposes of a party! And 2 dollar store bags filled 10 cones!)

I made the paper cones for the cotton candy using a sketch my husband came up with that made a cone shape and scalloped scissors to trim the edges (can I admit that for the life of me I could not draw a 3d cone shape that worked?! Geometry was NOT my subject. I did however pass cheerleading so...whatev.)
In the back corner I placed a bouquet of yellow, white and pink flowers in a pink vase I found at the thrift store months ago! I added 4 pink rhinestones to the top and white ribbon around the middle and pretended they were just for me.

Going up the center of the table were glass bottles of kiwi strawberry (snapple) juice that I added a slice of lemon to and a yellow straw (smoothie straws so they're thicker-from Walmart). And to tie in the strawberries on the cupcakes, I added a bowl of sliced strawberries in the center as well.

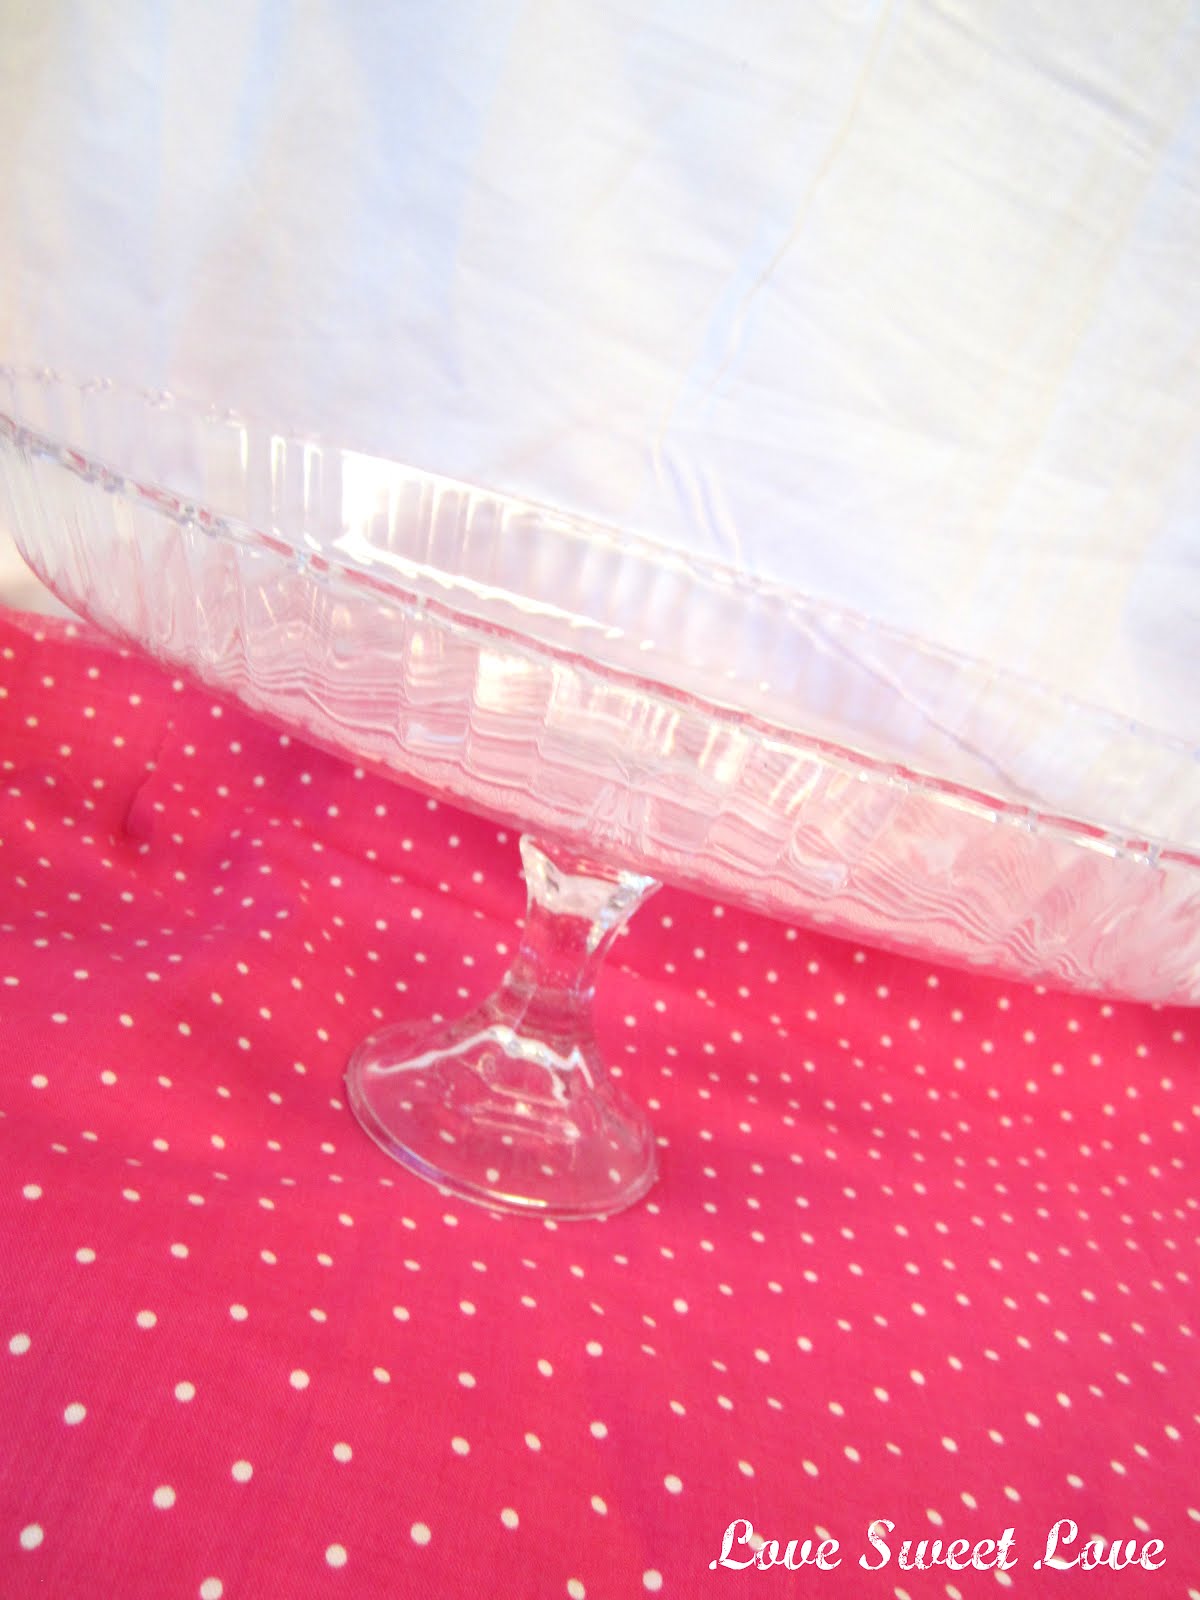
Worst moment of the day. My meltdown. Over cupcakes. But first I'll give you the good news. I made a cute cupcake stand for the birthday girls' cupcake (idea from I heart Naptime)!!

I started with a glass candlestick from the dollar store, a .50 wood piece from Hobby Lobby, some clear gloss paint and yellow paint from Rustoleum. I always spray paint my glass with some sealer first so that the spray paint sticks to it better. And then spray painted them both yellow.

Using some scrapbook paper from Hobby Lobby, I cut a circle the size of the top of the wood circle and mod podged it on.

Then I used E6000 to glue the candlestick to the wood.

And because it was in some serious need of frillyment, I added pink adhesive rhinestones around the edge of the circle and a little ribbon bow around the candlestick.

Back to the tragedy. Baking. WHY do I try?! Why?!
And the worst part is...I didn't even bake them. Mr. Sweet Love did!

I left the "icing" of the cupcakes till the day of the party because I didn't want them to get hard and crusty. Let's just say...what was supposed to be white icing, turned pink, then blue, then purple and then what can be described in the nicest words possible as 'dusty rose' pink. Then the attempted pretty icing swirls on top of the cupcakes turned into diarrhea looking blobs and the icing bag exploded 'dusty roseness' all over my hands, shirt and face. Awesome. I salvaged what sugar mess I had left and slapped it on some of the cupcakes with a knife and a grrrr, and opened the fridge to see what else I could do. I found some whip cream and some strawberries and tried to make something edible (and not completely revulting) of the ingredients that were left and still sanitary. Next time, if there IS a next time, I will be buying cupcakes. Just so you know.

Moving on :). At the back of table, to add a little height, I made some pink and white lollies. (I love this tutorial for making lollies if you're interested!) This one is a 3...for her 3rd bday.

And this one has her name and some sticker ballet shoes (from Hobby Lobby).

To make the pots, I just picked up 2 medium size ones from Micheals (.89 each) and spray painted them white. I stuffed some green styrofoam floral filler in the bottom of each pot and topped with yellow lemonhead candies. The lollies are attached (with double sided tape) to a skewer and stick right into the green floral stuff inside the pot. So simple but I love how much they add to the table!
On the left side of the table I had pink popcorn (white stove top popped popcorn with white chocolate (turned pink using food coloring) drizzled over the top of it) in little popcorn boxes I made, using this template, some scalloped scissors to trim the edges, and then tied a pink satin ribbon around the box.

The stands that the popcorn and cotton candy are sitting on were made from dollar store platters and candlesticks. Take a plastic platter...

...and a glass candlestick and use E6000 to glue together. LOVE the fun color possibilities of this by just using different color cans spray paint!
In the back left corner I added a candy jar I made for my Easter decorations last year. It's just a dollar store candlestick (I swear by these!) glued (using E6000 of course!) to a glass jar I found at a thrift store for $1, that I had spray painted yellow and then filled with pink candies. You could use gumballs, but since it's around Valentines they had lots of pink candies to choose from!

And last but not least, some PINK rice krispie treats! I was going to make my own from this recipe, but luckily it's valentines so they had boxes of these already made and they were cheaper than 1 box of rice krispies cereal!! Deal!

I really love how the whole table came together!

We have a fairly small kitchen-for party throwing anyway!-so I had to set up 2 card tables in the center of the kitchen to eat at. It was a tight squeeze but 3/4 year olds are pretty tiny so it worked ok.:)

I added another vase of flowers to the table, as well as pink plates, white napkins, white dollies, and wands (all purchased from the dollar store!) for each Ballerina.

My FAVORITE thing on these tables though, were the water bottles and the little bowls of lemonheads. Those little "pops" of yellow made me ridiculously happy.

I had the lemonade for the girls over on the food table, but I know some kids are pretty picky about what they eat/drink, so I decided to add some water to the tables and used the mini water bottles (8oz) and strips of yellow polka dot paper.

Just in case the magic of how to adhere paper to a water bottle blows your mind :)...you just place double sided tape on one end of the paper, stick it to the bottle, wrap it around the bottle and place another piece of tape on the end of the strip and attach it to the bottle.

My other favorite (can I have another favorite?!) thing were the placecards I made for each little ballerina. I pretty much exactly copied the one I found here. When the party was winding down I had the idea to double the use of the placecards and use them as thank you cards as well!

Since it was just cardstock folded in half, I just quickly opened up the placecard, wrote a thank you and stuck them in their favor bags before I handed them to the parents. I love getting more than one use out of things.
I love how the party turned out and little miss K was in absolute HEAVEN, but there are a few little details I had planned on doing that I just didn't have time to get done (maybe next time I'll give myself a 7 day window instead of 6...probably not). Like I would have loved to make a cute Happy Birthday pennant banner to hang on the food table and I wanted to make ballerina cupcake toppers (the same ballerina dresses that were on the invites, just stick a toothpick to the back of them to stick in the cupcake) and matching tutus for all the girls, but as the week was coming to a close I had to pick a few dreams to let go of. sigh. If only...ha ha! But you probably wouldn't have even noticed those things if I hadn't said them!
**Just in case you're trying to gather some ideas for your own ballerina extravaganza here are some of the games/activities we did (our party was an hour and a half)**:
1. As the guests arrived we decorated foam tiaras (from the dollar store) with princess stickers, glitter glue, markers, etc.
2.After doing cake, treats and presents we played 'Ballerina says'. Like Simon says, but Ballerina says twirl, jump, hop,etc. and if a player does an action when ballerina doesn't say they have to sit down.
3.Then we played Ballerina Relay.
split the group into 2 teams. Have a basket of princess stuff on one end of the room (opposite to where the 2 teams are lined up). Each basket should have an item for each member of the team. You could use princess dresses, shoes, necklace, ring, purse, feather boa, tiara, etc. The first person on each team runs to the basket puts on an item and has to run back to their team. They then remove whatever item they put on and the next person in line has to put that item on, run back to the basket and add a new item. Repeat until all items have been put on and the first team to empty their basket wins.
4. Next to calm them down a bit we played a fairy trivia game. I had a list of 10 questions about different princess/fairy movies or stories and whoever got the answer right got one m&m.
5. Then we made candy bracelets. I used twizzler pull aparts for the bracelet form and a few different candies that had holes in the center (lifesavers, gummy lifesavers, sour lifesavers, wintergreen lifesavers, etc.) to slide on the bracelet.
6. Then we played freeze dance where we turned on some ballet music (using Pandora) and whenever the music stopped they had to freeze. If you don't freeze you have to sit down. We had little girls that didn't quite understand this so mostly we just kept dancing when the music was on and when it turned off we'd wait for everyone to freeze before we turned it back on again.
I think the girls had a really good time and they loved that they got to dance with their wands throughout the party AND take them home! Yay for girly parties and YAY for it being over! ha ha!
Happy Birthday my beautiful Kylee, I hope all your wishes come true!!

I promise my next post will have some valentine goodness!!! Have a wonderful day, thanks for stopping by!!
Linking up to these great parties as well as:

You have read this article with the title Ballerina Birthday Party. You can bookmark this page URL http://loriescorner.blogspot.com/2012/01/ballerina-birthday-party.html. Thanks!


